[et_pb_section fb_built=”1″ _builder_version=”4.4.7″ custom_padding=”0px||0px||true|false” hover_enabled=”0″][et_pb_row _builder_version=”4.4.7″][et_pb_column _builder_version=”4.4.7″ type=”4_4″][et_pb_text _builder_version=”4.4.7″ link_text_color=”#8300e9″ hover_enabled=”0″]
I’m going to be walking you through how to use WordPress and then ultimately, how to set up a cool website just like this one. If you are a do it yourselfer or just don’t have the funds to have a site created for you, I am going to show you the step by step process. Even if you have little or no experience making a website previously, you are going to be fine.
Before we get started, I’m just going to cover a few things to give you a framework to work from. Then, we will do the step by step process on how you can make a WordPress website.
Hosting
Hosting of your is a concept that you may not be familiar with. It’s the place where all your content (blog posts, articles) are stored. Included in that is all of your photos and videos and basically everything that’s on your website is stored there.
When asked, I describe it to folks like this. You are thinking of building a new home. The first thing you do once you have to do is decide on the land you are going to build on. You can’t build a house without the land to build it on. I have used a variety of hosting services. I currently use BlueHost. The reason that I use them is based on studies done of all hosting services, they were the quickest in terms of page latency and had least downtime of all major providers.
BlueHost has other features such as unlimited domain hosting (we will talk about domains in a minute), automatic WordPress installation and unlimited email addresses for free. When I added the features to the performance, it was a no brainer to move to them. Not to say that there aren’t other quality hosting services. But I really like what BlueHost is doing. By the way, you are getting all of that for less than $50 for the year!
Domain is your house address
Once you have secured the land (hosting), the next thing on the construction list is the domain. Think of the domain as your house address. If your home is in the middle of the forest, it is hard to give directions to get there. Domains such as this one (SocialMediaDudes.com) or others (SideHustleConnection.com or ShelbyandBailey.com) are your web address.
I use NameCheap and have used GoDaddy to purchase my domains. By and large, the best practice is to have separate services for your domain and your hosting. That being said, I have seen lots of my customers buy everything together.
Domain names can be a challenge these days, so create a list of possible domains that will work for you. Try to keep it as short as possible (people may have to type that into their browser). Your domain should give some indication of what you are about or the products/services you provide.
Installing WordPress
Most hosting services provides 1 click installation of WordPress. I have posted other articles on why I think you should use WordPress, but overall, the reasons are that it is user friendly and allows you to change the look of the site with one click of a button by changing the theme (more about that in a moment) I am going to walk you through setting up WordPress on BlueHost.
Let’s get started. On the left-hand menu, click on My Sites and then in blue box in the upper right-hand corner, click on “Create Site”. That will bring you to a page that asks you “How would you like to build your website?” Click on the “Use WordPress” box on the left side of the page.
 WordPress is going to ask you some foundational questions such as the name of your site. The name of your site may be different than your domain (and mostly likely is slightly different). It will also ask you for a tag line. Tag lines are akin to slogans. These are optional and if provided, will show up on your website. Click on the submit button.
What comes up next is: “What domain do you want WordPress installed on? There is a dropdown menu of all of your available domains (most people have more than one, but definitely not a requirement). Select the domain you want to install WordPress on and click the Next button.
WordPress installed successfully!

Just as easy as that, WordPress is installed. Your username/password is available here (and will also be emailed to you), so now let’s get started on finishing up your site! Click on the “Login to WordPress” link. This will automatically take you to your WordPress dashboard – and this is the place where you go whenever you want to edit your site!
A quick note: the next time you want to make changes to your site, you are going to use your domain/wp-admin (example jpanico.com/wp-admin)
You are ready! Let’s Rock This Site!
Once you have logged into your site, the first thing we’re gonna do is install our theme. The theme is going to represent how your site looks and feels. There are a ton of both free and paid themes out there. My advice is to do a google search for the type of site you are. In my example, I might do a search for: free baked goods WordPress themes. Don’t get overwhelmed with choosing the wrong theme. One of the best features of a WordPress site is that you can change the entire look of your site by changing themes with just one click. It is easy.
A quick note. Make sure that you are choosing Themes that are “responsive” (mobile device friendly)
On the left-hand menu, click on Appearance/Themes. You will see there are some default themes there, but most likely you want something better. Click on the “Add New Theme” + box.
If you found and downloaded a theme from the internet, click on the “Upload Theme” box at the top. Otherwise, you might be better served by click on the Feature Filter and put in the subject, Features and Layout options that you are wanting your site to have. Then put in a description in the Search themes box on the right.
Search through the themes, previewing the ones that catch your interest. Once you have found the theme you want, select it and click the Install button. You may want to install multiple themes to compare. You will need to click on the Activate button on the theme you want to use. Changing themes is done by just activating a different theme.
Now that your theme has been installed, the next thing you may want to do is edit some of your site info. Most themes will have a Customize button where you can make edits to fonts, colors, Header images, Menus and Homepage settings. Be sure that you save your changes. While I want you to know where to do this, let’s wait for a minute because there are some things you will probably want to add before making all of the decisions. That being said, you can edit things like fonts, Contact info and Social Media icon settings and then come back later.
Get the basics set up!
On the left-hand menu, click on Settings. Take a moment to look at these and make changes as necessary. I am not going to take you through every setting, but there are a few that you are going to most likely want to change.
- General – Timezone and Date/Time formats. If you don’t want your tagline showing up (maybe because it is part of your logo), remove it here.
- Writing – Default Post Category – Categories are found under Posts/Categories. When you create a blog post, you can assign one or more categories to it. What this allows a visitor to do is to find similar posts in the same category. Think of the different subjects (categories) that you might be writing about and create them. Don’t worry if the list is not complete. You can always add new ones. Select the Default Post Category here to save you time.
- Reading – Most likely, this will be covered in your Theme customization, but things to consider are if you want the full text or a summary of your blog post to display.
- Discussion – Determine if you want to have people comment on your site. If you do decide to do so, I would advise that you check “A comment is held for moderation” checkbox. You don’t want people putting links on your site that are not appropriate.
- Permalinks – I recommend that you use Post name. Makes it easier for search engines in general. Can you do something a little more advanced? Yes, but let’s walk before you run.
- Privacy – To be clear, you need a privacy page. You will have to follow privacy laws. You can use the default page or search the internet for something you are more comfortable with. Take the time to review this.
Set up your site pages
Before we generate site pages, let’s talk about the Media menu. This is where your sites pictures and videos are held. You can add any pics/videos you think you are going to use here. Or you can add pictures to the Media library as you need them.
Let’s go to the Pages menu. Under the All Pages selection, there is most likely a Sample and Privacy page. We spoke above of addressing the Privacy page. Here is where you are going to add pages such as:
- About – Where you indicate about your business, how you got involved and maybe some background on yourself/family.
- Contact Page – Give people wanting to reach out to you a way to contact with you. You may think to put your email address on your page, but you should also be prepared for a good bit of spam. I am not saying to omit but know what you are getting yourself into.
- Services/Products – Highlight the offerings that your business provides.
- FAQ’s – Frequently Asked Questions pages help you to qualify your potential customer and minimize questions that are routinely thought of, but sometimes never asked.
- Blog – Blogs are posted that are posted regularly that helps portray you as an expert in your field. Don’t sell yourself short here. You are further ahead than other folks and they may just like your style/approach.
Create any pages you want and begin to populate it with content. The beauty about using WordPress is that you can be working on these pages and keep them private until you are ready to “Publish”. Don’t worry about the order of the pages just yet. We are going to sequence them in a few minutes. Use Page names to provide site visitors a clear understanding of where they are going.
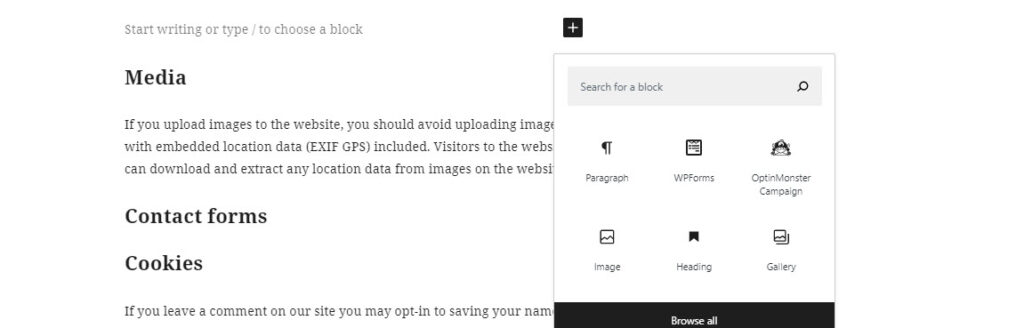
Now that the pages have been created, let’s walk through how to enter content. In the text block type (or copy and paste from a document you created) into the box. Make changes to the Header/Paragraph level, what you want bolded, links to other parts of your site or to other sites, etc. You can easily add media by clicking on the + button and then Image, which will allow you to select a current picture/video or adding a new one. When adding pictures, be aware of the size of the picture you are adding to the page as it will impact the speed.
To add media on the fly, click Change image and then you can just go here to upload files and then you pick your file. The title of your page is what is going to show up at the top on the site menu.
To sequence the pages in the order you want on your site, go to Appearance/Menus. Create a Menu Name and then select all of the Pages you want to display. (Pages have to be “published” in order to show up here). Once you select the pages, you are then able to put them into the order you want. You can even do sub-menus if you like. For example, you might have a Products page, but then have different pages for the types of products. Baked goods/Cakes/Pies/etc If you want to rearrange them, you can just go move them up or down and then if you also want to put something in a subcategory, all you have to do is just move it to the right and that will make it into a subcategory.
Blog posts
Blog posts can be a variety of post types (written, video or audio). We are just going to take baby steps here and create a written post. On the menu, click Posts/Add New. You will need to add a Title (think search engine optimization), and then fill in the content in the same manner as you did on the pages.
Just filling in the content (and adding media) is not the end of the post. Be sure to add a Featured Image, select 1 or more Categories and add tags. Tags are similar to Categories but are probably more finite. More importantly, they play a big part in SEO and having you get found organically.
Don’t forget Theme Customization
Let’s circle back to the Appearance or Theme Customizations to make any edits we need. Some of these edits are going to be whether or not you have a Home page that has a slider, what pages those sliders will link to, whether or not you want to display blog posts (and how many) on your home page, etc.
Your Customizations may include a Footer page. A Footer page is where you can provide consistent details about your site and might include a map location, contact information, site pages and other details.
WordPress Plugins
Don’t think that just because you aren’t a total geek (you are making your own website, so you kind of are), that your website can’t have some cool functionality. Plugins are bits of software that work with WordPress to either extend or expand on the functionality of your site. Some act behind the scenes and some are more customer facing. I will do a further post about plugins, but they can help you with SEO, make a contact form or so many other things.
To install a plugin, go to Plugins/Add new. Search for a plugin (for example Yoast SEO), select it and then Activate it. Some plugins need configured, so check on that to make sure you are getting the full benefit of what they are supposed to do. If you have a plugin and decide not to use it, you can either deactivate it or delete it.
Anytime you want to see how your website looks like to the world, you can click at the top where the name of your site is. A dropdown will display “Visit site”. You can navigate your site, test out functionality and toggle back to the dashboard to make changes when you are ready.
Launch your site!
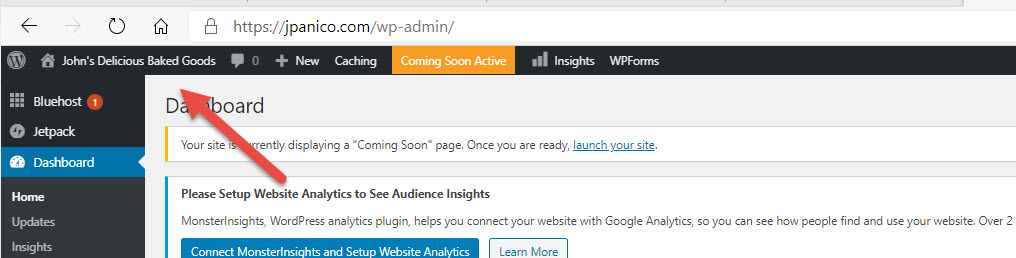
You should be proud of yourself! But keep in mind that all the work that has been done is not accessible to the public..yet! You have pretty much been in preview mode as you have been steadily working to get your site ready. In fact, if you gave anyone your website address, they would see “Coming Soon!”.
But you are ready to have friends, family (and hopefully customers) see it. On the Dashboard, at the top, you will see the link “launch your site” It will then have you push one more button and your site is then live on the internet.
Congrats! Job well done!
Your Takeaway…
A WordPress website for your business is something you can do. You don’t have to be a super geek to have something you can be proud of. So, if you have the time and patience (it will take a little of both) and your budget doesn’t provide for a professional, I will tell you it is better to have a site than not 100% of the time (maybe with a few “qualified exceptions”)
But you CAN create a great looking website that people will want to do business with you if you take a little time to do it correctly.
However, I also want you to remember this. We are decades past “build it and they will come”. Websites need feeding of content that is updated consistently. If you use good SEO tactics, you will attract an audience over time. You will most likely need to promote your website by either doing some sort of advertising or through social media. They both work.
Finally, if you don’t feel like you are up to the task, perhaps you have already started and the site isn’t looking like you want or maybe you have so many other things on your plate, that you want your website done by a pro, click here and let’s discuss your needs. Consultations are free and I may be able to provide you a few tips/insights to get you there on your own.
Was this article helpful? If so, please comment below.
[/et_pb_text][/et_pb_column][/et_pb_row][/et_pb_section]